Categories
Education Online Education

How to Split Your Online Lecture to Keep Your Students Engaged

Divide and conquer  

I often hear faculty claiming their students don’t engage as much online as they do during in-person classes. Blame the bad internet connection, the overstimulation from the computer, or online platform’ issues. The truth is that attending class online is nothing like attending in person. Now, this doesn’t mean online classes provide students with fewer opportunities to learn, nor do they have to be less productive or engaging. But as both experiences are quite different, the approach to teaching needs to be different as well. 

The best way to keep your students engaged during an online lecture is by creating plenty of occasions for them to interact and learn. Instead of planing a two-hour non-stop lecture, you better plan several 10-minute-length learning activities. 

This is how you can split your online lecture into short, meaningful, and engaging learning activities to keep your students engaged.


1. Warm-up energizer

Duration: 5 -10 min

The first five minutes of your lecture are crucial because it determines how much a student will care and pay attention thereafter. It’s like when you watch a movie on Netflix, if you’re not caught up over the first minutes, you’re likely to switch to the next flick.  

A warm-up or energizer is a great way to kick off your lecture. It’s not only a means to captivate the mind of your students but also to prepare them for the learning itself.

You can imagine a 5 or 10 minutes activity that will help students get into the zone before you go in depth with the curriculum. The warm-up can start by asking your students how they feel and their current mood. Not only this will break the ice, but it will give you an idea of students’ state of mind and learn about any struggles they might be facing. A mood wall can be perfect for this, use a word cloud app or have students write their mood on the blackboard.

Once everyone shares how they are and feel, you can pass to a fun energizer to set the ambiance and elevate students’ mood. 

You don’t need to prepare a complex ice breaker. Something as simple as a show and tell will do. You can ask your students to show an object of their choice and share a memory or story with the class, explaining why they chose that object. You can also do a gif contest where students post a gif that represents their current state of mind — and body — at then have them vote for the best one. Everyone would have a laugh and will get energized to start the lecture. There is plenty of fun and simple energizers you may want to try. All you need is 5 to 10 minutes to get the ambiance going and give students time to energize and get ready to absorb new knowledge and stay focused.


2. Recap the last topic

Duration: 10 -15 min

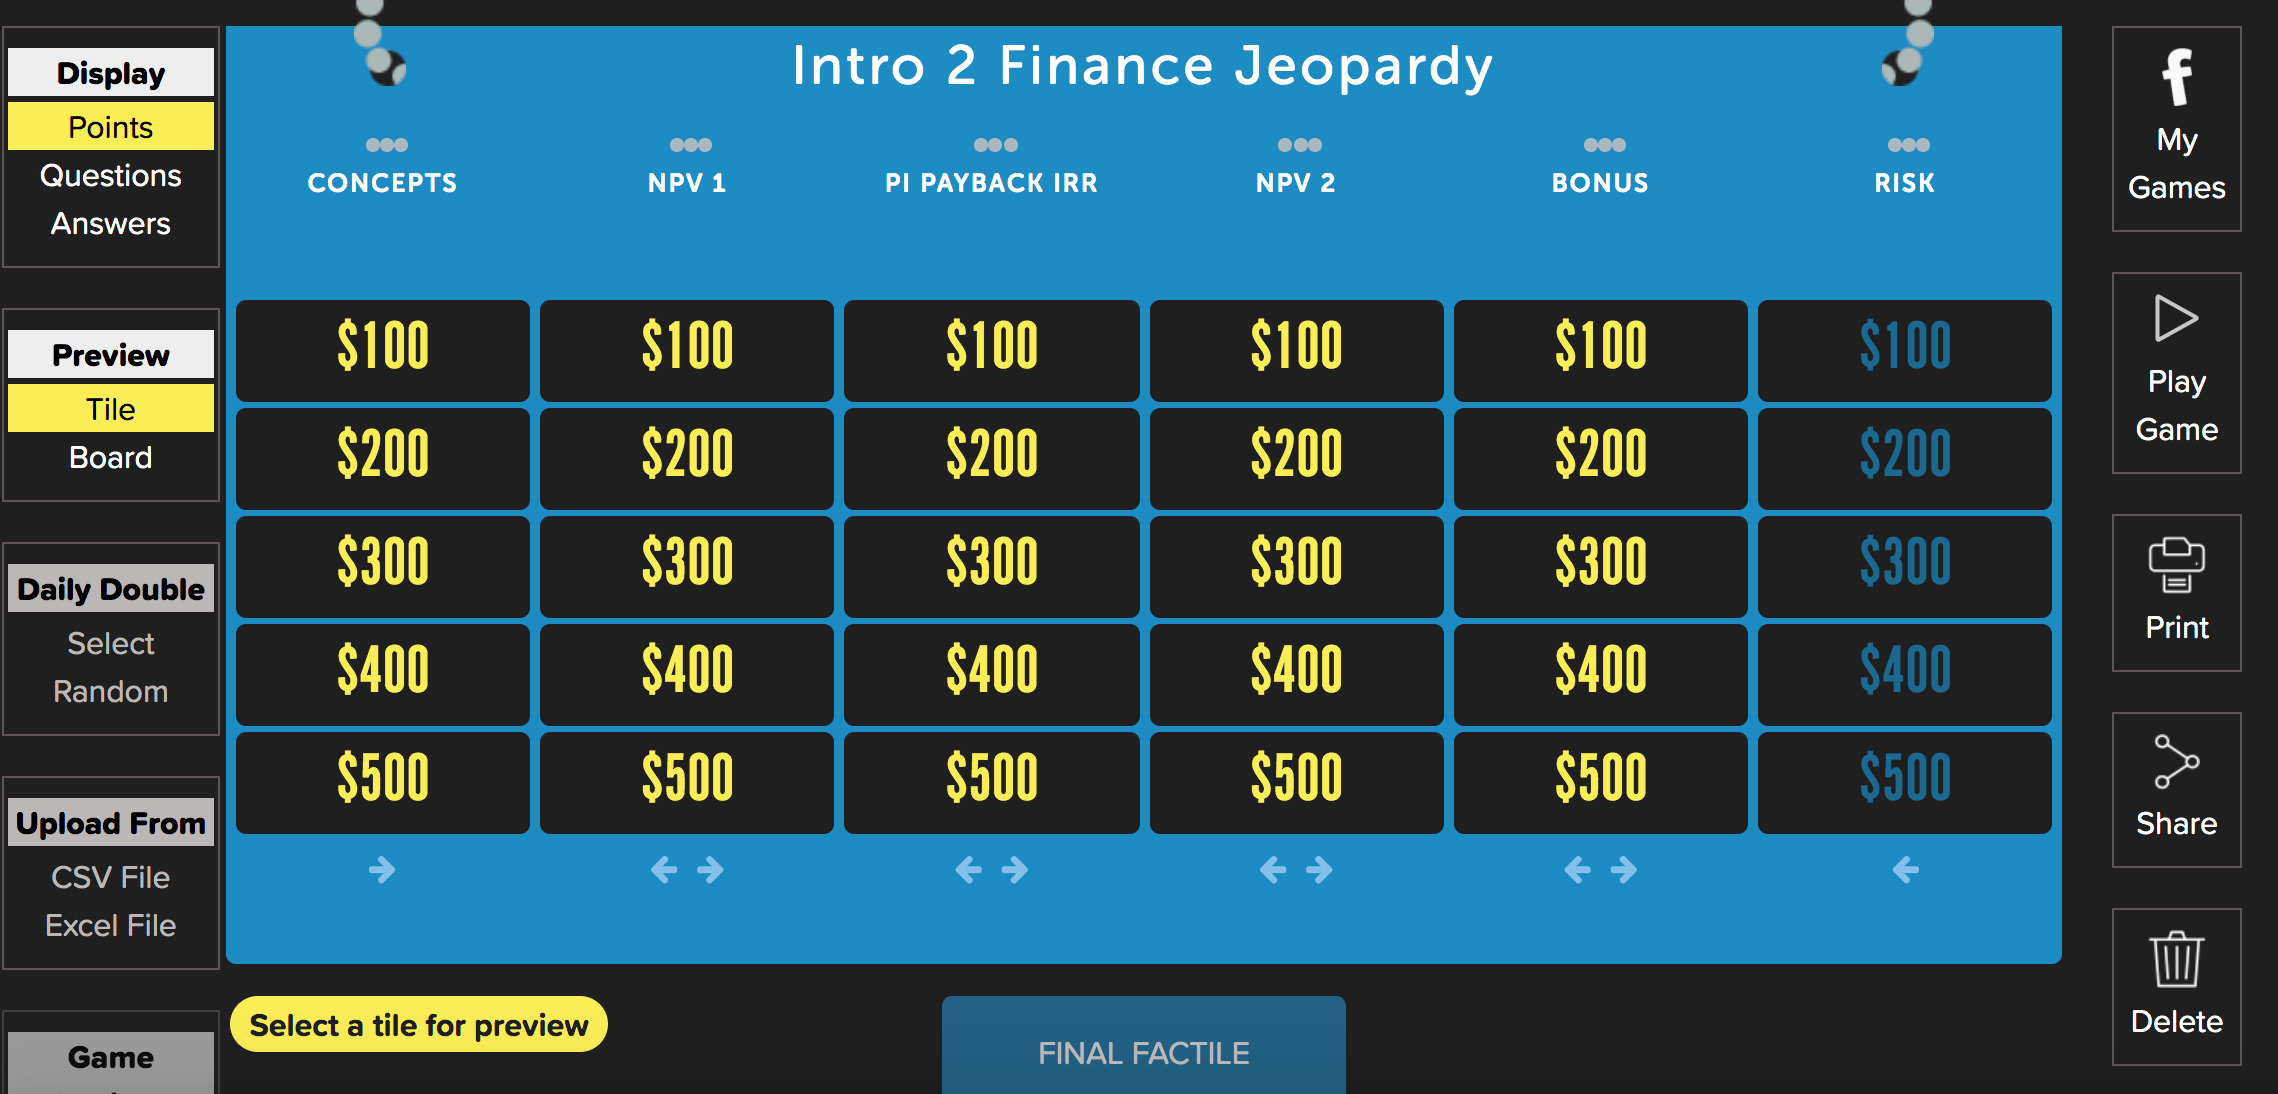
To make sure everyone gets into the zone before introducing any new subject, start by doing a recap of the last topics. You can use gamification to make recaps more engaging. So instead of talking through a set of slides to recap the last lecture, replace it with a short interactive quiz to test students’ knowledge and understanding of concepts in a fun way. 

You can prepare a set of five or ten questions about the concepts seen during the last lecture. Instead of asking all the questions at once, you’ll ask one question at a time, followed by a brief discussion to explain the correct answer. Once they answer the question, you can ask the student leading on the board to explain to their classmates why their answer was right. Then, you can add up to their reasoning and fill in the gaps if needed. 

While the leaderboard itself encourages students to put their best efforts into the task, you can improve their engagement by adding a small prize to the contest. I usually go with a sweet treat, coffee, or something of the sort.

There are plenty of apps that are easy and free to use like kahoot, slido or quizlet.


3. Topic introduction

Duration: 10 -15 min

After the recap and once everyone is in the zone, you can now introduce the lecture’s topic. The idea is to proceed gently into the new learning material without losing students’ attention.

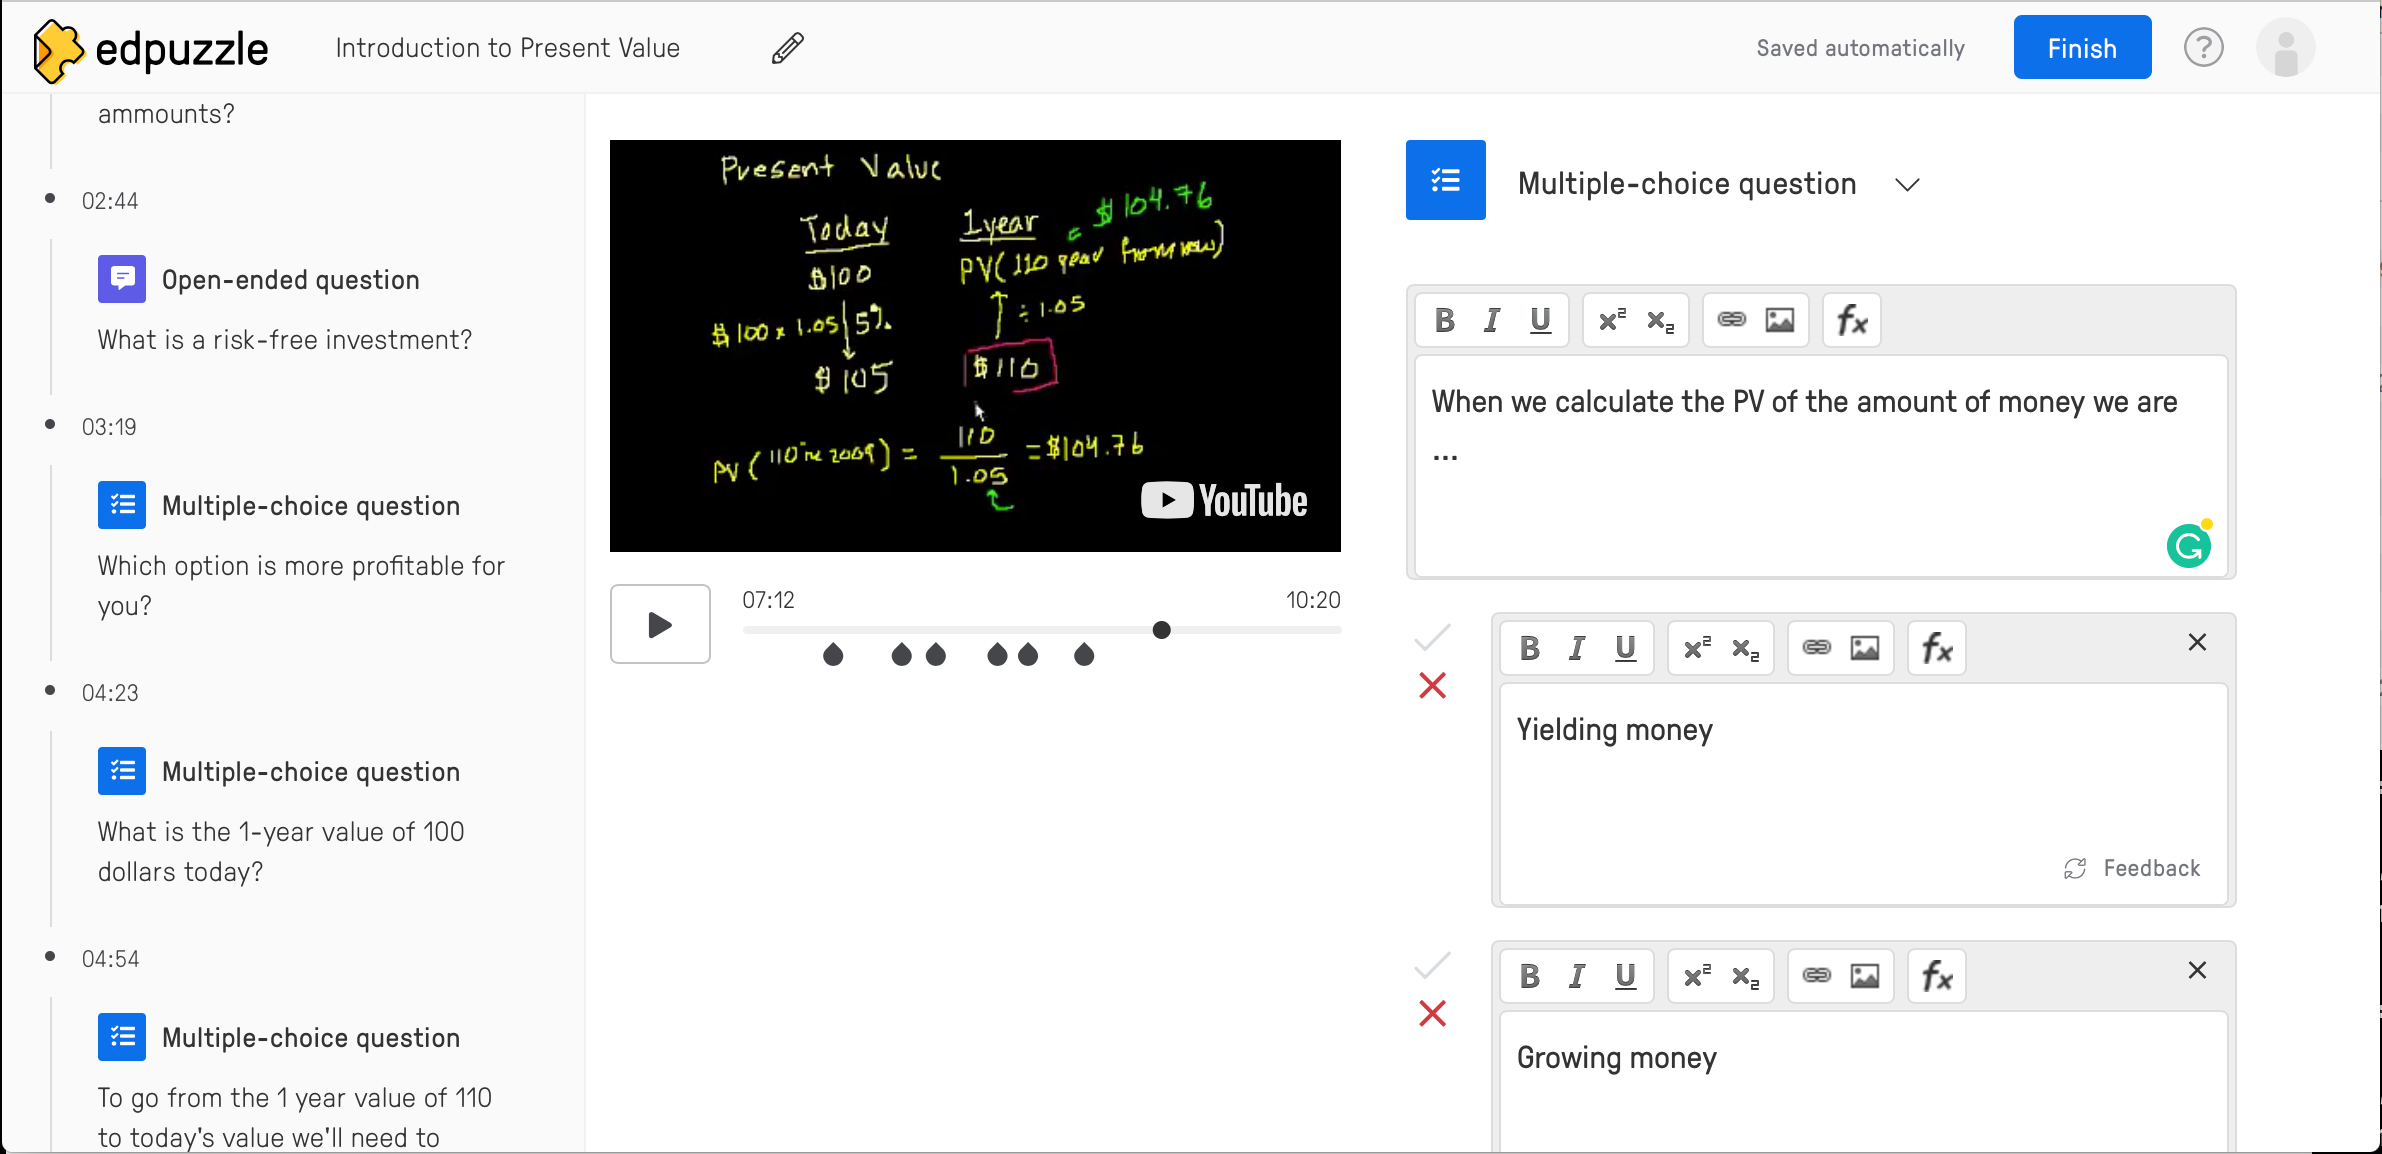
There are many alternatives to introducing new topics that are more effective than a set of slides. You can, for example, show a short video that relates to the topic. TED platform has an impressive library for you to use and get the conversation going. Or, you can start with some questions and have students list or state what they know and don’t know about the new topic. 

Another engaging method for introducing new topics is through storytelling. Relating study content to real-life situations can help students understand the importance of the topic and make meaning out of it. You can narrate a story from your own experience or from a business or someone else, depending on the subject. For example, when introducing a unit on innovation, you can use the example of how Apple came up with the iPod idea. 


4. Break

Duration: 5 -10 min each (Repeat 2 or 3 times, depending on lecture’s length)

Attention span is shorter for online classes compare to those in person. So breaks are really important and you should have them more frequently. They do not need to be long breaks, and my take is they should not last over 5 to 10 minutes — unless your lecture is scheduled during lunch hours. Breaks should allow students to go to the toilet, grab a coffee, stretch legs and clear the mind. With longer breaks, you risk losing some of your students both physically and mentally as they step out of their learning zone.

The key is to plan frequent brief pauses, let’s say two or three 5 minute breaks for every hour of lecture instead of having one 15 minute break in the middle of the class. 

I also find it very effective to announce to your students when those breaks will take place from the very beginning of your class. This will help students to keep focused during the lecture time, as they don’t need to wonder when they can rush to the toilets or grab a cup of coffee. 


5. Go deeper

Duration: 15 -20 min 

After everyone has stretched, you can now come back to your lecture and go deeper into the topic. It’s time to get to the core of the lecture and do your thing.

The way you approach this part is up to you and depends a lot on the topic you’re teaching. There are as many approaches as there are topics to teach. Just remember to mix it up and try to provide as many opportunities for learning to every student as possible.  


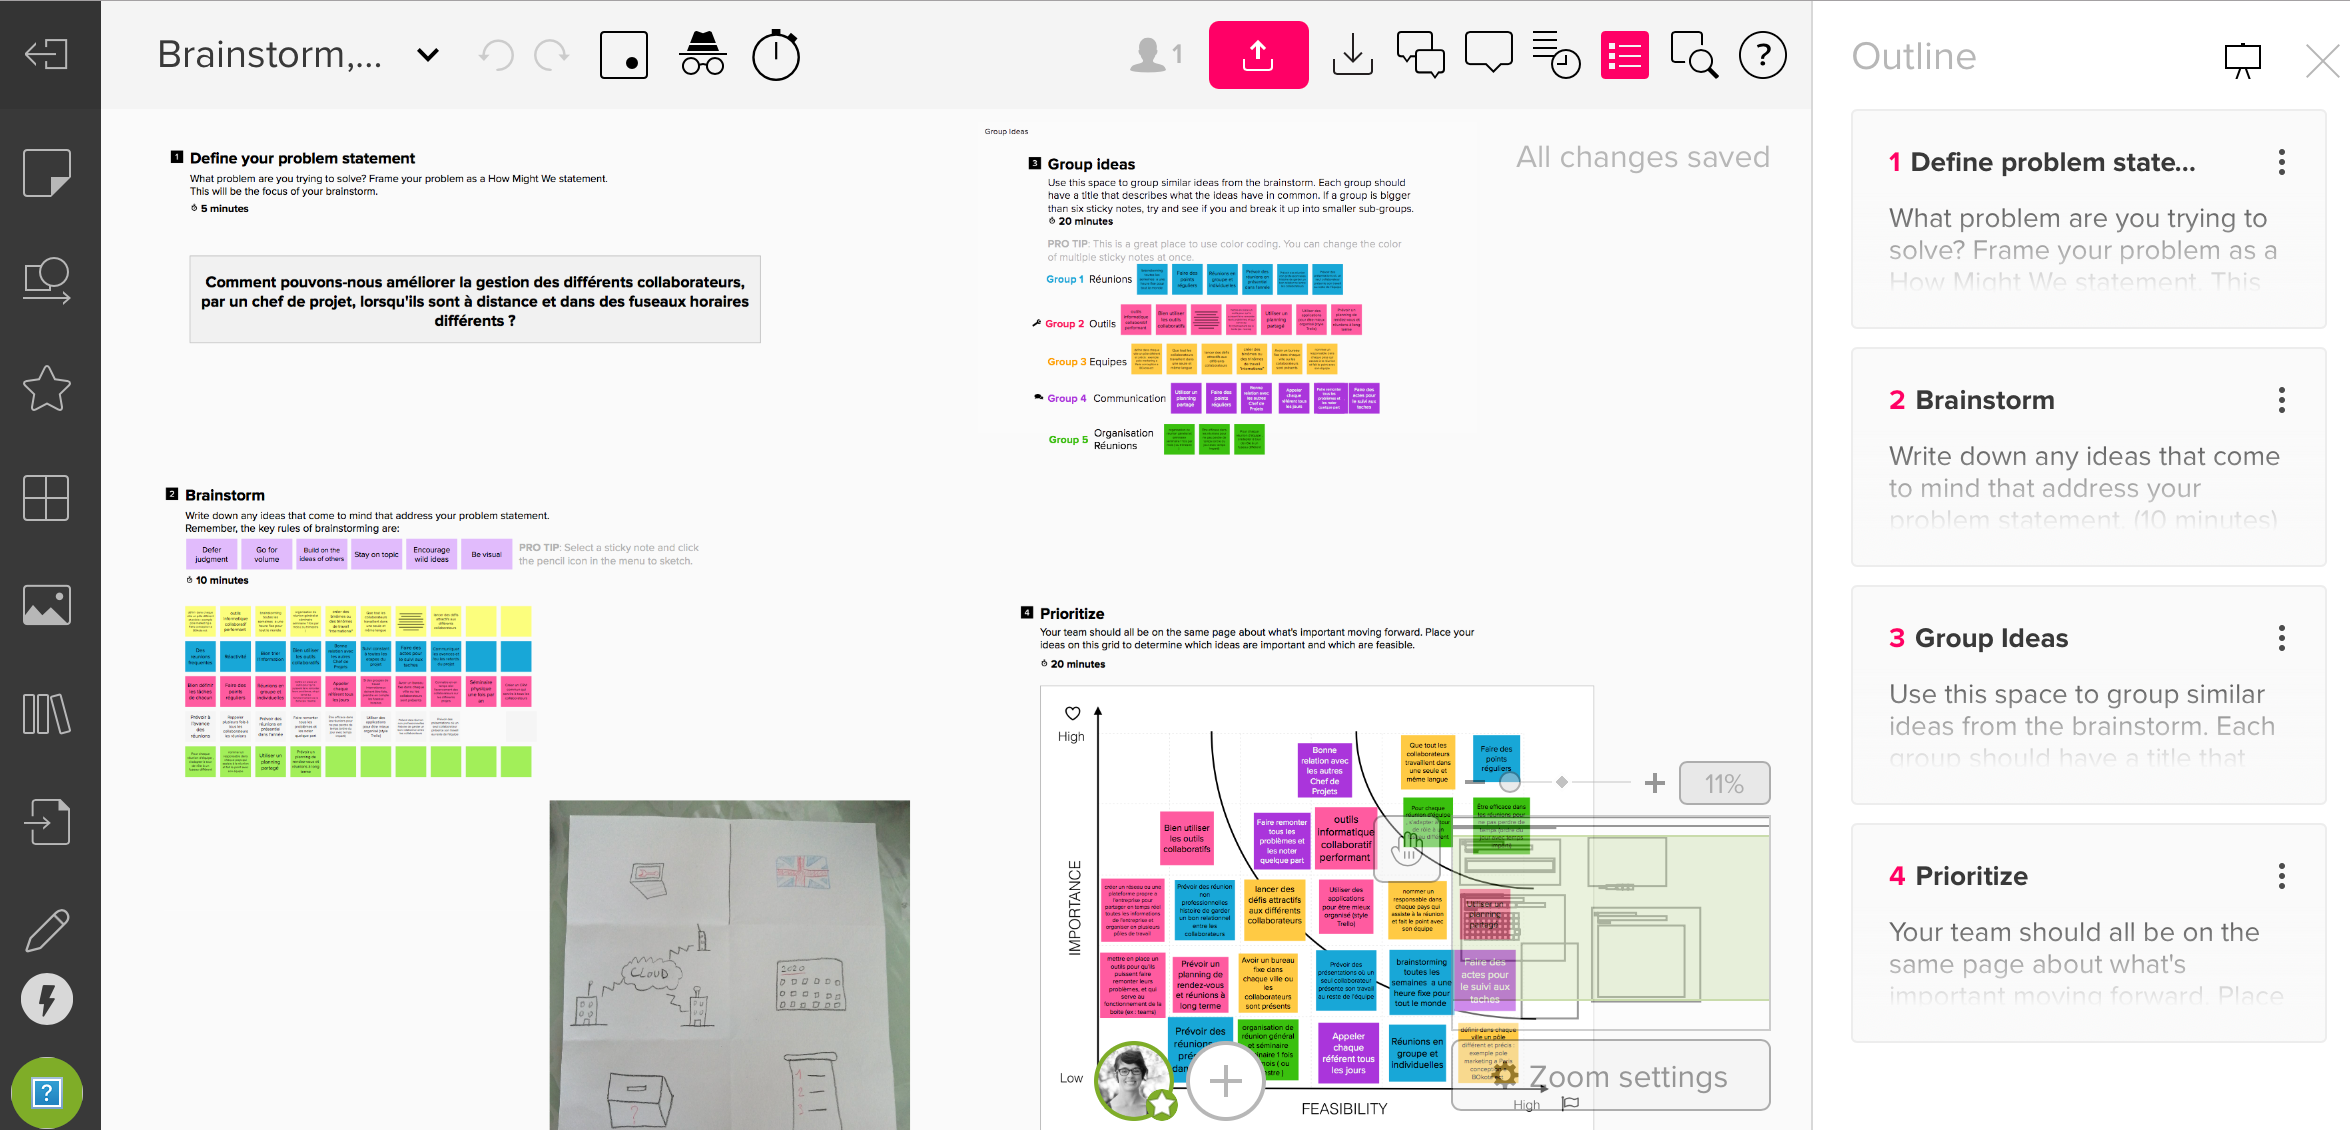
6. Group activity and breakout rooms

Duration: 30 min

Letting students work on autonomy is crucial to ensure they’ve understood and interiorize the topics taught. Group activities are also great for developing social skills and encouraging peer learning. 

There are plenty of active learning exercises you can use to emphasize a topic. The most common are studies cases, but you can also go with the jigsaw technique or scavenger hunts to spur up active learning.

Breakout rooms are the best way for conducting group activities, as students can work independently and not get distracted by what’s happening with other groups. However, breakout rooms can sometimes be a challenge for teachers because if not designed cautiously, students may use them as an escape room. 

My advice is that you explain clearly what you expect from them and require a deliverable. Be sure to handle written instructions about how to complete the task and what the deliverable should look like. I find really helpful to name a facilitator per group that will lead the group work and ensure they completed the task and meet the requirements. Also, it’s important to visit frequently each room to see if there are doubts or difficulties in completing the activity. Visiting the breakrooms is crucial even when the group doesn’t request help explicitly, this will also show that the activity is not optional.


7. Q&A

Duration: 5- 10 min

Once group activity is over, is important to take some time to answer questions, doubts or just discuss the task itself and the process of completing it. 

The goal of the Q&A is to ensure everyone is on the same page. It helps to consolidate the skills and knowledge gained during the task performed earlier and to collect feedback. Each group can share their outcomes and you can facilitate a discussion around the how, what, and why of the task completed. 


8. Wrap up

Duration: 5 min

A wrap-up is where you summarize briefly what you’ve just taught and learn during the lecture. It’s really important to end each lesson with a quick recap of what you have covered in class. As for the Q&A just before, this quick review of the lecture’s key points is essential to reinforce learning. 

A wrap-up can consist of a slide with a bullet point list with the main takeaways. But I recommend doing something more interactive so that you involve your students in wrapping up the content and somehow test what they’ve learned. I suggest using a collaborative blackboard where you and your students can add to the discussion. Apps such as explaineverything or miro work great for this purpose. 


9. Retrospection 

Duration : 5 -10 min (homework)

Finally, you can close the lesson with a retrospection exercise. Here is where students get to reflect on their learning experience, not just what they’ve learned, but how they’ve learned. 

Since this is kind of deep and personal, I usually leave it as homework. My favorite way of carrying this out is through 1-minute videos where students get to post individually their thoughts. I post a video with two to four questions and ask them to post their answers as soon as possible while they still have the ideas fresh in their minds. 

Some possible questions are:

  • What was a eureka moment (something you learn that really caught your attention)?
  • What did you find challenging?
  • What part of the class did you like/dislike the most?
  • What things do you think we missed out?
  • What are three takeaways from today’s lecture?
  • What would you like to learn or go deeper next? 

For video assignments, I use flipgrid because it’s really easy to use and you can control how videos are shared between your class and on the web. But you could also use moodle or canvas tools. Or if your students are ok with it, Instagram is also a possibility.


In a nutshell, the key to engaging online classes is delivering small chunks of knowledge and information at a time and providing plenty of diverse opportunities to learn. 

Remember to warm up to get into the zone, plan frequent and short breaks, design short group activities, wrap up with the main takeaways, and reflect on the learning experience.

If you want to keep your students’ attention, make it short, make it meaningful, and make it fun. 

Categories
Education Online Education

4 Ways to Connect With Students in a Virtual Classroom

Remote doesn’t have to mean distant

In times of physical distancing, it’s hard to build connections. While online learning is probably the best option in today’s context, there’s nothing like face-to-face lectures to make connections.

Who doesn’t miss the classroom, the campus, those coffee breaks to mingle, the lunch hour to catch up with friends and colleagues? 

We all do. But despite how much we want to come back to our classrooms, the pandemic is still here and there’s no choice but to keep classes online. Now, does it mean we may better forget about connections? 

Well, not quite. I think it’s time we make peace with the challenges of remote learning and start looking at opportunities to make it work.

Learning is a social process. So relationships are crucial.

In this post, I’m going to talk about 5 different ways to connect with your students and how to encourage learning in a remote classroom.


1. Build a community 

Creating a sense of belonging and a safe, nurturing, supporting environment is crucial for learning. Learning is mainly a social and emotional activity.

It doesn’t take the latest technology or complex activities to build a positive learning community. And it doesn’t matter much whether your courses are online or in-person. Creating a sense of community is way easier than you think and is full of benefits for both learners and educators.

Remember that community is built over time, and mutual sharing and trust are essential.

Researchers identify 4 essential elements that create a sense of community:

  • Mutual interdependence among members: show students how their behavior and attitudes impact other members of the community. Show them how they can work as a group towards goals and how they can support each other. Rely frequently on peer-learning and group work to create interdependences and encourage a sense of belonging.
  • Connectedness & trust: students need to learn to trust you and each other. This is crucial for learning. Give your students space to mingle and get to know you and their classmates. Use storytelling techniques and make time for introductions, sharing fears, emotions, and expectations. 
  • Interactivity: give students opportunities to interact with you and with each other, both during lecture hours and beyond. Plan for group activities and learning games. You can also use back channels and forums to maintain the interaction even after class. This creates interdependency, trust, and helps fight the feeling of isolation.
  • Shared values and goals: give students the opportunity to set up their own shared goals, values, and agreements at the beginning of the course. These common goals are crucial to building trust and connections among students, and developing a sense of responsibility.

More on how to create a sense of community in your classroom here.


2. Use social media

Before the pandemic, I’d never thought at my 34 years I will enter the world of TikTok. I mean, Instagram was already new enough for me. Until my young sister convinced me. And I’ve to say that it’s an amazing way for connecting with your students.

My social accounts are mainly for teaching. So, I publish nothing too personal, but I share a part of myself in every post I make. From funny TikToks to short explainer posts, I use social media to connect with my students beyond the classroom’s ‘virtual’ walls. 

Social media channels are an effective way of creating connections with your students because it’s a place where they feel at ease. It’s a great tool to create less formal conversations with your students and to share your human side.

You can use Instagram to post beautiful visuals related to the lecture topics; Visuals are a great way to engage your students and are effective for learning and remembering concepts.

But the most interesting feature of both TikTok and Instagram is the 15 to 60 seconds videos to explain a concept, give real-life examples, or recap on a specific topic. Whether it is only you speaking or an animated slideshow to explain a topic, videos generate more engagement than pictures and are more valuable for teaching. Funny TikTok videos that explain a concept are probably more relatable to students than your slide deck. As a result, they get to laugh and learn at the same time. 

You can also hold live sessions on both TikTok and Instagram, which is an excellent alternative to office hours or Q&A sessions. You can just go live at a planned schedule and your students join to ask their questions. Unlike Zoom or Meet, there’s no need to send invites or give conference access codes. They just need their phone and internet connection to join. 

Other significant features of Instagram are the quiz and polls. While you cannot expect to do a final exam using these functionalities, you can use them to do in-class or out-class fun challenges. You can invite your students to answer your story quiz while they are supposed to be studying for the final term. This can help them study, but what is most, it improves their confidence so they freak out less for the exam.

Social media is a great tool to connect with people remotely. So, why couldn’t we use it for connecting with our students?


3. Keep the conversation going

Most of the learning happens outside the classroom. So remember to keep the conversation going even after lecture hours. 

And I’m not talking about sending emails to your students, but giving them an appropriate space to share their thoughts, doubts, questions, feedback or comments they may have after or before the lecture. 

You can use backchannels as an informal way for students to interact with the educator and their classmates as an online forum designed to complement classroom activity. But you can also create specific channels to discuss topics that are not directly related to your lecture, but that are crucial for students like mental health, stress, or specific struggles.

You can, for example, use slack or discord to communicate with your students during and beyond lecture hours. You can create discussion channels about different topics and invite students to share their thoughts. 

Sometimes it takes just a short encouraging message to let your students know you’re there for them to help them overcome the challenges of remote learning. Check up on your students regularly, and make space for discussion about their mental health, struggles, expectations, doubts, and aspirations. Remember that like you, they miss the connection, the touch, the warmth of socializing.


4. Use video recaps or introductions

Sometimes, remote learning is all about asynchronous activities and there’s brief space to get to know your students or for your students to get to know you. And even when lectures are held completely on Zoom or other videoconferencing platforms, there’s never enough time to make proper introductions and create connections.

It’s difficult to connect with your students, and that your students connect with you and each other when they’re all with their mics and cameras off. And while I truly hate talking to the black squares, I also know that some students are really struggling behind those squares, others are hiding, and many don’t have the proper equipment. Is not just a matter of disengagement.

Thus, an excellent way to create space for connection and for interaction is through video introductions and recap. Think of it as video discussions and threads, you post a short but engaging video in your preferred platform and ask your students to react and post their reactions in the thread.

There are plenty of platforms that can be used for this. I use Flipgrid, a free social learning app, to create and share short and exceptional videos. Each grid has a unique code that you can share with your students so they can access the topics and the videos being posted by the professors and classmates. It is a magnificent tool for reflective learning and for building solid learning communities within your classes. As an educator you can post discussion prompts and students may respond with short videos, whether they are learning in class or at home.

But you can also use your institution’s LMS, both Canvas, and Moodle support video assignments, and it works similarly to Flipgrid. 

I often start all my lectures by posting an introduction video where I introduce myself, the class topic, the primary goals, and the teaching approach I use. Then I ask students to respond with a video, introducing themselves, sharing their expectations about the course and one or two things they would like to address in class. 

Doing this before starting my zoom lectures is really beneficial because I get to know my students and they get to know me and get a hint about what they’re about to learn. 

Now, this video activity can be held all throughout the semester. You can transform traditional written assignments into oral video discussions. This reduces the feeling of teaching to complete strangers and being alone in the journey. 


To sum up

Connecting with your students remotely is not a simple task, and it’ll probably never replace the physical connection. But, with some creativity and minor adjustments to your mindset and teaching approaches, you can make your lectures more welcoming and favorable for bonding. 

Remember that learning is a social process, connection and trust are essential.

As an educator, our job is not only to pass on knowledge and give access to learning resources but also to ensure that the environment is safe and auspicious for learning to happen. 

Remote doesn’t have to mean distant. Virtual doesn’t have to mean computerized. Let’s not forget about the human component of learning. No matter the channel we teach through, we are teaching humans, and humans need connections.

Categories
Education Online Education

3 Simple Strategies for Promoting Equity in a Remote Classroom

How to address the digital and social divide remotely

We all know that teaching remotely is hard. But what about learning remotely? How are students coping? Are they learning? 

I always start my lectures with a simple question: “How are you coping?” During the first weeks of lockdown, I received mostly a “meh”. I guess the situation was so unique that students were almost amused to have their classes moved online and their exams canceled. What a relief. But then, after the first week went by, the ambiance changed. Stress and anxiety took over. Isolation started to look serious. And well, some students just disappeared. 

This fall, things didn’t get any better. Going back to normal is not on our agendas anymore. 

As an educator, how do you meet the diverse needs of each student? How do you promote equity in an online classroom? How can you ensure each student has the same opportunities to learn and thrive? How do you address the digital and social divide remotely?

In this post, I will go through three strategies to promote equity in a virtual, remote classroom.


#1. Start with Empathy

Everything starts with empathy. Empathy is the ability to sense other people’s emotions and the ability to imagine what someone else might be thinking or feeling.

Like us, students are going through uncertain times. Many are struggling, and learning is not on their top priorities. Others are trying to stay focus and on track, but distractions keep coming their way. 

This pandemic hasn’t been easy on them. Graduations were canceled. Transitions from one school to another were dismissed. Goodbyes were moved to phone calls. Nothing was smooth, and we have no idea when and how things will move forward. 

When I ask my students how they are coping and how they feel about remote learning, most of them express anxiety. Many feel lost. “It’s hard to concentrate”, “my connection is terrible”, “I have a hard time with the software” are some feedback I frequently get from students. 

Before we can address any learning, we need to care. We need to show our students we are here for them. We need to remember that not every student has the access to technology, or to a quiet study room, or to the needed materials. Some of them have to take care of their siblings while their parents work. Others have to work to pay their rent, meals, and education. Some of them might be going through traumatic or post-traumatic situations, they might have lost someone to Covid-19, their parents might have lost their jobs. 

The last thing these students need is more homework, more applications to manage, more strict deadlines. They need empathy. 

We, as teachers, need to imagine the entire story. Before we frame a student for laziness, we should reach out and try to understand and support them every time we can. 

Having an empathetic approach is not only essential to learning and promoting equity in a classroom, but it also encourages students to develop empathy for others. Empathy increases the sense of community and fosters relationships based on trust and tolerance within and outside the classroom.  


#2. Provide Different Opportunities to Learn

Remote learning can be exhausting and annoying. I know, from experience, that having 3 straight hours of a virtual lecture is painful. I, for example, cannot bear more than 20 minutes of a webinar without doing something else in parallel. Why should I expect more from my students? 

Remote learning shouldn’t mean 100% screen learning. There are plenty of opportunities to learn (and to teach) remotely that don’t involve screens. Also, there are a plethora of activities that can be carried asynchronously.

If we want to promote equity in our classroom, we need to provide students with different opportunities to learn. This means that when we plan for activities and assessments we have to think about learning styles, access to technology, and technical skills.

Some students learn better through visuals. Others learn by practicing. Some rely on memory to absorb knowledge. As educators, we need to think of alternative learning approaches to ensure every student grasps as much knowledge and skills as possible. 

Instead of asking students to hand in an essay on a topic, suggest different ways for achieving the learning outcome. I usually give students the possibility to choose the format of their work. They can choose between writing, making mind-maps, recording videos, or recording podcast series. 

You can imagine also having multiple activities, both synchronous and asynchronous, to convey the same idea. You could, for example, host an online quiz on a topic and also ask students to reflect on the topic by recording a video or writing a blog post. Use different content and vary the assessment methods. The possibilities are vast. The more occasions for learning your students have, the more likely they’ll actually learn. 


#3. Ensure Technology Access and Knowledge

Not every student has the same access to technology. Not every student has the same technical skills to manage those technologies. 

Is not because they are digital natives that they can quickly adopt new software or applications and be at ease. 

Some students don’t even have a laptop or a stable internet connection at home. Many rely on one computer for the entire household. Others are constrained to follow their classes on their phones. In these circumstances, how can you ensure technology access for each student?

While there are some institutions and governments equipping low-income students with laptops, there are still many that don’t have access to any financial aid. And even when the equipment is provided, many students don’t have the technical skills demanded by the different software and applications used in the virtual classroom.

I truly believe in the potential of technology for education, but I also know that it can cause more isolation and disparity in the classroom if not addressed properly. 

When choosing the technology and virtual tools for your classroom, make sure you check this list:

  • It is available at no cost for students, or the institution can pay for students’ licenses. 
  • It is compatible with all operating systems and devices.
  • It integrates easily with other applications and technologies used by students and the institution, like the LMS from your school, the video conferencing tool you use, etc. 
  • There is an installation and getting started users’ guide. Otherwise, create a short and simple one for your classroom. 
  • Students have access to video tutorials and technical forums.
  • It runs with slow internet speed or no internet connection.

Once you check these, make sure the technology you choose increases the student learning experience and skill development. Ask yourself how these technologies help you and your students achieve their learning goals? What is the added value for you and for them? 

I also recommend devoting at least one session at the beginning of the semester to help learners familiarize themselves with the applications. If you are afraid it takes too much of your class time, you can prepare some getting-to-know-the-tool activities to complete in asynchronous before class. 

I, for example, give students access to the tools one or two weeks in advance. I usually send them preparatory activities just to get used to the applications. So when we use it in class, they don’t discover something completely new. While not every student will do the assignment in advance, those who did can help others, this facilitates the initiation with the tools.


Final Thoughts

Effective remote learning and equity in the classroom rely on empathy. The more we put ourselves in students’ shoes, the more we can imagine better opportunities for learning. 

It is important that, as educators, we promote a fair and welcoming remote learning environment for our students. We need to think about accessibility, empowerment, engagement, and students’ special needs. 

Learning remotely is challenging, but there are avenues to make it better. It takes only a few simple tweaks of mindset but a lot of care. We need to make it better and accessible to all our students. 

For sure we won’t be able to control everything, especially the injustices that subsist outside the classroom, but we can provide scaffolds and support systems that help students learn and thrive.


If you, like me, are interested in making your online classes more engaging, then I’d love to hear what are your strategies and tools you are using in your classroom. Drop your comments with ideas or questions here below.

Ready to shift to Online Education? Subscribe to my newsletter and receive monthly tips and tricks on how to make your online classes more engaging.

Categories
Education Online Education

Top 5 Free Tools to Make Your Online Classes More Interactive

Keep your students engaged and learning

We all know remote teaching is challenging. While we know online classes are the best option in the current context, there is no secret about how difficult it can be to ensure students’ learning and active involvement.

Let’s be honest, Zoom classes and traditional slides are not enough. Students are not participating, and unfortunately, they are not learning. This is not completely their fault. It’s not because they don’t care, but because they struggle. They struggle to stay focus; they struggle to connect with others; they struggle to become active learners.

And it’s not our fault either, we are all doing our best. We are trying to adapt to extreme circumstances, without proper training, support, or even enough time to change the curriculum. 

The good news is that there are plenty of tools and online resources out there to help us make our classes more engaging and interactive. 

To save you time and help you choose the right tools for your classes, I have selected 5 of my favorite tools for online education. In this post, I’ll give you a hint to some of the best-in-market, low-budget, and user-friendly applications for improving the online learning experience and some ideas on how to use them.

Let’s start.


1. Explain Everything

Explain Everything is my favorite interactive whiteboard platform. And quite frankly is much more than a collaborative whiteboard. With Explain Everything, you can create video beats about your lecture topics and share it with students to check for understanding. You can either record your slideshow while you speak, or draw and write on the whiteboard and record everything you said and add to it. 

Another pretty interesting functionality is the collaborative whiteboard. You can create groups and invite your students to collaborate on projects. Students can work on cloud projects simultaneously or at their own pace, and you have an eye on their work in real-time. This is great both for synchronous and asynchronous group work. What I love about this is that participants that join the whiteboard at the same time can hear one another thanks to their audio chat.

Finally, you can also livecast your whiteboard and keep your online classes engaging. Either by using a videoconferencing system (Zoom, Microsoft Teams, Google Meet, etc) or just by sharing the whiteboard link, participants can see in real-time what’s happening. This is a great option for big sized synchronous classes. 

Explain Everything is free up to three simultaneous projects, but for only 3 dollars per month, you get access to unlimited projects, slides, and recordings. 


2. Mural

Mural is also one of my favorite apps for interactive online learning and visual collaboration. Mural is essentially a remote design thinking platform, but its potential for education is outstanding.

As an educator, you can invite up to 100 members or guests to your workspace and collaborate with students and other faculty in real-time. You can have dedicated rooms for each class or group of students to encourage teamwork and project-based learning. Inside each room you can create several murals that can be set to private or public, depending on how you want to share it. 

Screenshot from the Author

Mural works as a big whiteboard that you can organize in different small areas to outline your lecture session. From course kick-offs, warm-ups and energizers, brainstorming, traditional slide-decks, the possibilities with Mural are infinite. 

The functionalities I love the most are their chronometer, the celebrate button, and the facilitator superpowers. With the chronometer you can set up timing for each activity in the Mural and thus plan with more precision each of your lectures, ensuring also time for breaks. The celebrate button is just a lovely confetti party that you can throw every time the class completes an activity. Everyone will get the confetti party on their screen. This is great for rewarding effort and progress. Finally, you can assign Facilitator superpowers to your students so they take the leader role on their team. Facilitator superpowers include the possibility of timing activities, start voting sessions, and celebrate task completion. Giving facilitator superpowers to students is an original way to engage your students and make them accountable for their learning.

Mural is free for educators and students. You just need to create an account with your institutional address and provide proof of your status. For an education plan you can apply here. 


3. Playfactile

PlayFactile is a learning platform that lets teachers create engaging Jeopardy-style quiz games for the classroom. You can create and personalize your own game boards or use pre-made quizzes shared by the community. With PlayFactile you can either host live jeopardy games, regular multiple choice quizzes, memory games, and create study flashcards to improve students’ learning proficiency. 

Screenshot from Author.

These jeopardy games can be a great option to complement the traditional slide lectures, as you can divide the board into different topics and use it as a kick-off or wrap up activity. Students can then review their learning while playing, and you can instantly complement concepts when doubts arise. 

Students can play individually or in teams and they can choose beautiful avatars and nicknames. You can control whether they use their names or a default nickname. 

With the free version, you can create up to 5 teams for each game and you can host up to 3 games. With the education version, only 5 USD per month, you can play and create as many games as you want and have over 50 teams. The premium account offers other amazing features like buzzer mode, memory and choice games, and share flashcards.


4. Edpuzzle

I recently came upon Edpuzzle and I’m convinced of its potential for enhancing online learning. Edpuzzle is a video platform where you can create and edit videos from the web and use them in your classroom. Take any video from YouTube, Khan Academy, Learn Zillion, or your own and build your lessons around them. 

Video and visuals are more effective for learning than traditional slides, but most of us, teachers and professors, don’t have time to create sketch videos for every lesson. Here’s where Edpuzzle stands out. You can just turn existing videos from any platform and tailored them for learning. 

You can use any video and transform it into engaging video lectures thanks to the embedded questions and voice-over features. You can just insert open-ended and multiple-choice questions all along the video to check for understanding. No need to reinvent the wheel.

Screenshot by the Author.

Edpuzzle takes videos to another level, converting them into video lessons. If you want to make sure your students watch and actually learn from the video, then Edpuzzle is just the right tool. 

What I love about this app is that you can integrate it with Explain Everything to upload your whiteboard videos and convert them into quizzes. Edpuzzle is free.


5. Sli.do

Sli.do is a great tool for promoting active learning in online classes. It helps you involve your students in the lectures. The possibilities are endless. With Sli.do you can empower your students to ask questions, vote in polls, and be a part of the lecture by using a simple Q&A and polling tool.

  • With polls, you can learn if your lecture’s content resonates with your students. You can also use them to drive meaningful discussions in your class.
  • Use quizzes to find out how much your students remember from your lectures. Use them to recap the content from the last topic. Or motivate your students to pay attention during your lecture by hosting a live quiz.
  • Use the Q&A feature to collect students’ questions and feedback throughout your lecture and address them as they come or in a dedicated Q&A session at the end of your class. You and your students can upvote and provide answers in real-time, making peer-learning possible.

Another awesome feature is the switcher app. With Slido Switcher, you can display polls or questions on top of your presentation using your smartphone as a remote control. Whether you use PowerPoint or Keynote, with the Switcher app you can change seamlessly between your presentation and the Slido event.

Sli.do offers an education package starting at $5 per month. But you can also use the free version for up to 100 participants and one event at a time.


If you, like me, are interested in making your online classes more engaging, then I’d love to hear what are your strategies and tools you are using in your classroom. Drop your comments with ideas or questions here below.

Ready to shift to Online Education? Subscribe to my newsletter and receive monthly tips and tricks on how to make your online classes more engaging.

Categories
Education Online Education

15 Free Digital Tools to Boost Students’ Engagement Online


15 Free Digital Tools to Boost Students’ Engagement Online

A review of digital tools and ideas for teachers to support formative assessment in online classrooms

Engaging students online is nothing like engaging students in physical classrooms. It can be challenging, especially in times of crisis as students have to deal with more stress and anxiety.

For many learners, online learning is a new experience. And even when they have the best intentions, they can easily get distracted and lose interest. This can cause a higher number of students dropping out of school or resiting classes. Also, students with special needs and learning disorders are more likely to feel lost and disengage.

While engaging students online can be more challenging, the learning experience can be as good or even better than in the traditional physical classroom. With the proper planning and tools, remote teaching can be as effective as in-person teaching.

To save you time, effort, and money, I have compiled a list of the top free tools to increase your students’ engagement online. No matter if you are a newbie or an expert, these tools are the best in their market and are free, or almost.

This post will tell you everything you need to know about from the best online tools and resources for engaging students online.


Collaborative Annotation

1. Diigo

Diigo is a social bookmarking with excellent organization tools. The main value of Diigo is how it increases both students and teacher productivity while making it fun. Teachers can create student accounts for an entire class with just a few clicks and access to premium functionalities for free (apply here).

You can create your personal library in the cloud for each of your courses, with links, pages, notes, pictures, and invite students so that they can access it and annotate. Students of the same class are automatically set up as a Diigo group so they can start using all the benefits that a Diigo group provides, such as group bookmarks and annotations, and group forums. Students can then collaborate and all read the same article and discuss synchronously right on the page.

You can also provide feedback to students’ work and writings by posting sticky notes and making screen captures and marking it up. Diigo provides powerful search capabilities.

You can find anything easily, even your own annotations. Diigo also provides excellent organization capabilities, with both tagging and lists, to suit different needs.

2. Evernote

Evernote is one of my favorite apps for learning. Is one powerful tool. Evernote is a note-taking app that can do much more than just taking notes. Like diigo, Evernote lets you save any content, forever. With Evernote you can do almost everything you want, is like a second brain. From a simple checklist to writing business plans, from class note-taking to academic research, from organizing your ideas to organizing your team.

Evernote is compatible with all kinds of devices and operating systems, and it is accessible also through the web app. You can share with your students complete notebooks, composed of unique resources, and organize it with tags. Guests are allowed to annotate and collaborate if you give them permission, or just read if you restrict it.

Evernote has a free version that’s quite complete for students. But the premium version is accessible and gives you the power to add notes to pdf files, do a text search on all your content, save and access revision history of your notes, send yourself emails with notes and integrate other apps like google drive. For a quick guide on how to use Evernote, you can read this article.

3. Notion

Notion started as a collaborative document editor. But you can do many other things. Students can use it to take and share notes in class or to organize their tasks with to-do lists.

But as an educator Notion can be the perfect workspace for your syllabi, notes, assignments, grades, and much more. You can create your course syllabi and share it with your students or create a wiki for the class.

Notion offers built-in templates that make student and teachers’ life easier. Students can find tools for building grade calculators, personal budget, job applications. While teachers can adopt ready-to-use templates for lesson plans, schedules, and class directory.

Notion is free for both students and educators. With an official institutional email address, you get access to unlimited block storage and no file upload limit.

4. Hypothes.is

Hypothes.is is not like any other annotation tool. If I have to be honest, is one of my favorites. Not only it’s a remarkable tool, but it is also open-source and completely free. Hypothes.is goes beyond traditional digital annotation, they enable sentence-level note-taking or discussion on classroom reading, news, blogs, scientific articles, books, terms of service, ballot initiatives, legislation, and more. The beautiful about it is that it promotes web literacy and digital citizenship in students, more than any other app.

Educators need to create an account and then send the registration link to their students. Students will then be able to access the readings assignments and start annotating. You can also create private annotation groups. So, for example, if you want your students to work in smaller groups, you can send them special links. This link will also serve as the group home page with a list of members and texts annotated by the group. You can also link to a stream of annotations created by group members from the group home page.

Hypothes.is has a Chrome browser extension and is compatible with almost all Learning Management Systems (Canva, and Moodle included). For a quick guide on how to use it in your classroom, go here.

Visual collaboration and communication tools are also a brilliant way to make your online classes more dynamic and to motivate your students to be more active. There are several apps for doing this, but Mural and Miro are my favorite.


Visual Collaboration

5. Mural

A digital workspace for visual collaboration. As an educator, you can apply for a free facilitator account and start collaborating with other educators and students. With the educator account, you can have up to 10 team members (which can edit, facilitate and create murals) and 20 guests (only for collaborating to murals you give them access to) to your mural spaces. With Mural you can conduct virtual brain-storming sessions, use canvas layouts and frameworks designed by experts for different activities (business model, mind-mapping, empathy map, many others). you can break out your classroom in groups so that students’ teams can collaborate in different workspaces. You can apply for a Mural educator account here. Here you can find a tutorial on how to use Mural for education.

6. Miro

Similar to Mural, Miro is an app that acts as a virtual whiteboard for team collaboration. Educators and students can apply for a free education account that has the same functionalities as the pro version. Even if you don’t apply for the education account, you can create your free account and have up to 3 whiteboards to play with. You can invite an unlimited number of viewers and have small teams collaborating in your whiteboards. Otherwise, with the educational plan, you can invite and collaborate with as many students as you want and create unlimited whiteboards. To apply for an education account, you just need to apply here.


Engagement and gamification

Games are by far the most effective way to keep students engaged in learning, off and online. There is nothing more gratifying for learners than getting rewards and recognition when they work hard for it. Not only games are fun, but they facilitate learning. There are plenty of apps available for educators (and anyone else) for creating challenges, evaluations, and assignments while leaving the boring side apart. These two are my favorite.

7. Kahoot

The most famous interactive quiz platform is Kahoot, a free student-response that uses many gamification techniques to engage students’ participation and enhance learning. With Kahoot, you can both host live quizzes and self-paced challenges for out-of-class review. You can play Kahoot games in single mode or in team mode and offer plenty of fun features to stimulate students to play and learn. Kahoot offers a basic free plan where you can invite up to 50 players, host online games, play, and create as many Kahoots as you want and have assessments of reports ready to download. Premium plans start at 5 USD per month and you get more amazing features and more players.

8. Sli.do

With sli.do you can empower your students to ask questions, vote in polls, and be a part of the lecture by using a simple Q&A and polling tool. Sli.do is a great tool for promoting active learning in online classes. It allows you to involve your students in your lecture and give them the freedom to express their opinion via live polls, quizzes, brainstorming. The possibilities are vast.

  • With polls, you can learn if your lecture’s content resonates with your students. You can also use them to drive meaningful discussions in your class.
  • Use quizzes to find out how much your students remember from your lectures. Use them to recap the content from the last lecture. Or motivate your students to pay attention during your lecture by hosting a quiz at the end.
  • Use the questions feature to collect students’ questions throughout your lecture and address them as they come in or in a dedicated Q&A session at the end of your class. You and your students can upvote and provide their answers in real-time, making peer-learning possible.

Another awesome feature is the switcher app. With Slido Switcher, you can display polls or questions on top of your presentation using your smartphone as a remote control. Whether you use PowerPoint, Keynote, or Prezi, our Switcher app allows you to switch seamlessly between your presentation and Slido.

Sli.do offers an education package starting at $5 per month. But you can also use the free version for free for up to 100 participants.

9. Factile

Have you ever played jeopardy? Well, Factile is a free learning platform that lets teachers create engaging Jeopardy-style quiz games for the classroom. You can create and personalize your own game boards or use pre-made quizzes shared by the community. With Factile you can either host jeopardy games, regular multiple choice quizzes, memory games, and create study flashcards to improve students’ learning proficiency. As Kahoot, you can play Factile in teams or individually. With the free version you can create up to 5 teams for each game and you can host up to 3 games. For as little at 5 USD per month, you can play and create as many games as you want and have over 50 teams. The premium account offers other amazing features like buzzer mode, play memory and choice games, play, and share flashcards.

Other great free apps for quizzes and assessments are quizziz and quizlet.


Interactive Activities

Online assessment and homework need not be boring. There are plenty of tools you can use to overcome the physical distancing and the lack of face-to-face interaction between you and your students. Collaboration and social co-creation are possible online thanks to technology. These are my favorite/

10. Wakelet

A free platform that allows you to curate and organize content from different platforms to save and share with students, colleagues, and friends. You need to create a collection — something like hashtags topics on Instagram — and students can contribute to adding text, pdf, videos, URLs, images, and Flipgrid shorts. These are brilliant ways for students to express their learning. Apart from this, the teacher can encourage creativity among the learners by inviting students to approach the assessment the way they want to. The idea behind Wakelet is to curate content like you will do for blogs (like Medium) or magazines. You can synthesize a bunch of different content, filter out the noise, and keep what is valuable in one sole collection to better communicate about a specific concept or topic. Wakalet is completely free and its potential is amazing.

11. Flipgrid

Flipgrid is a free social learning app to create and share short and exceptional videos. As an educator, you have free access to the app and you can create different grids — classrooms — and topics of discussion. Each grid has a unique code that you can share with your students so they can access the topics and the videos being posted by the professors and classmates. It is a magnificent tool for reflective learning and for building solid learning communities within your classes. As an educator you can post discussion prompts and students may respond with short videos, whether they are learning in class or at home. Flipgrid is completely free. For more info on how to use it, read the beginner’s guide here.


Backchannel discussion

Backchannel discussions are a great way for learners to have an on-topic conversation during a lecture. It is an effective way to keep your students engaged during an online session and continue the conversation afterward.

Unlike quiz tools like Kahoot, backchannels are not based on competition or gamification. The aim is not to test students’ knowledge. Instead, a backchannel is an informal way for students to interact with the educator and their classmates in the form of an online forum designed to complement classroom activity.

12. Slack

Initially conceived for business team communication and project management, slack can also be an outstanding tool for education. From planning and teaching curriculum to managing student services, slack offers amazing functionalities for both students and educators. You can create one workspace for each course, each with a set of channels for classroom work, discussion, group projects, and office hours. Students can use channels to post clarifying questions and comments throughout the lesson, and their classmates can use emoji reactions to second questions or show support for comments. Slack is compatible with Zoom, so when running a virtual classroom on Zoom you can directly access slack channels and questions. You can use threads to organize smaller group discussions around specific topics during the class. Slack is free, but for a better experience and more control over your interactions, and data premium plan is a better option. Slack offers 85% discount on the premium plan to education institutions. You can apply here.

13. Padlet

Padlet is a productivity software and we are pretty keen on making your work life easier. It’s essentially an online bulletin board, something like a notice board. It is an outstanding tool for making classes more interactive as it has a wide range of features such as sharing and collaborating documents, videos, post. But the best of it is their Backchannel option.

Padlet Backchannel provides a familiar messaging interface for both synchronous and asynchronous class discussions. You can use Padlet for student conversations during a lecture, for brainstorming ideas, or for Q&A session. You can make your Backchannels private, password-protected, secret, or fully public. You can also make them read-only or add admins. Another exceptional functionality is their Profanity filter that replaces bad words with emojis. You can also turn on discussion moderation and approve all messages before they show up for other readers.

While Padlet is not for free, it is still accessible at 99$/year per educator and includes unlimited student accounts.


Video conferencing and virtual classroom

Video conferencing is one of the best ways to get in touch with your students remotely. It’s a brilliant tool for having engaging conversations and lectures where you need interaction and peer discussion.

14. Zoom

The most common software for videoconferencing used by businesses and educators. Zoom has a freemium service. It’s great for hosting webinars, meetings, group collaborations, and calls. With a free account, you can invite up to 100 participants, have face-to-face interviews, and up to 40 minutes of group conference. With the current pandemic situation, Zoom has removed the 40 minute limit for educators. You just need to create an account with your institutional email address.

15. BigBlueButton

An alternative open source web conferencing system for online learning. The goal of the project is to provide remote students with a high-quality online learning experience. BigBlueButton is amazing because you can have the same Zoom pro functionalities for free. The software is really user-friendly. BBB has a whiteboard that you can share with your participants, you can breakout rooms for team collaboration and create polls during your virtual lecture. Here you can find a user guide on how to use BigBlueButton for education.

Another great software is google meet, which you can access for free if you have a google classroom account. Also, you have Newrow which offers amazing functionalities with its pro version.


Final words

While engaging students online can be more challenging, the learning experience can be as good or even better than in the traditional physical classroom. With the proper planning and tools, remote teaching can be as effective as in-person teaching.

You can anticipate and prevent students’ disengagement and procrastination by implementing these tools.

Engaging students online is not much more difficult than engaging with them in a physical classroom. Online methods provide a wide range of alternatives to promote active learning and teamwork.


Ready to shift to Online Education? Receive monthly tips and tricks on how to make your online classes more engaging.

Categories
Education Online Education

Hybrid and Flexible: A Professor’s Guide to Hyflex Teaching

How to conquer teaching during a pandemic

We have to recognize that educators have responded amazingly to the abrupt shift to online teaching. Of course, it hasn’t been easy, but in general terms, it all worked out pretty well.

I mean, we were agile.

We adapted and effectuate with the resources we had at hand and tried to continue providing our very best to our students. Other organizations couldn’t adapt that well. Many just closed down and went out of service.

We can criticize as much as we like, but let’s admit it, educators adapted fast. Chapeau.

However, we were reacting to a first-in-our-times pandemic. It caught us unnoticed. We had no choice. Adapt was our only option.

Now is time to prepare for the new normal. If we can call it normal.

A second wave of the pandemic is just around the corner. In the U.S. and South America, we are still struggling to control for the first wave.

So, no matter how much we miss our students and classrooms, we have to come around the idea that remote learning will be our new normal.

But we need to be prepared. If we want to keep our sanity and that of our students, we can’t continue functioning in an urgent-crisis-mode, not for long.

We need to think about more appropriate teaching and learning methods that encourage interaction, reflection, learning, skills development while still guaranteeing safety and health conditions to professors and students.

Below, I discuss why hybrid and flexible (Hyflex) approach is an exceptional alternative to 100% online or in-person teaching. I go through 4 crucial factors to consider when transitioning to Hyflex courses and how to provide an effective learning opportunity for all students.

Let’s begin by understanding what Hyflex is.

The Hyflex approach

The Hyflex (Hybrid-flexible) approach was first created by Brian Beatty who is Associate Professor of instructional technologies in the Department of Equity, Leadership Studies, and Instructional Technologies at San Francisco State University.

The idea behind the Hyflex method was to provide a bridge to a fully online program. A Hyflex program consist of hybrid classes — blending online and on-site participation modes — that provide a more flexible learning experience to students. While in a typical hybrid or blended course all students have to take part in both classroom and online sessions, Hyflex courses take into account also the possibility for some students to be 100% online or on-site. Hyflex programs allowed maximum student choice in participation mode. Students can decide for themselves which path is the “best” for them on a daily or weekly basis.

In short, the basis of Hyflex programs is to provide students with multiple forms of learning approaches: from the way content and information are presented, to the place they receive those contents, to the way we assess their knowledge.

The main difference between hybrid and Hyflex courses is the flexible component. That means that instead of building something, whether is class material or assessment activities, for just one mode (online or on-site) you build it so it’s adaptable for both modes. In this way, you are optimizing the effort and providing equal opportunities for learning to every and each student.

Example: Imagine that you were trying to fix your computer on your own. You have mainly three options: 1) you can call someone who knows how to repair it and explain to you how to do it, 2) you can check out on an online forum and follow the step-by-step instructions given by someone who has already repaired theirs, or 3) you can watch a YouTube tutorial and mirror the steps followed in the video. Probably the easier option would be to watch the YouTube tutorial. But it would also be nice if you had the written instructions to go through just in case you missed something, and why not had direct feedback from an expert to be sure you got it right. Well, that’s kind of the idea behind Hyflex.

Students as Active Learners

Contrary to traditional lecture-type teaching methods, the Hyflex approach is aimed to be student-centered. This means that students have an active role in their learning process and experience. As educators, our role is to encourage students to take full ownership of their learning, from the definition of their goals throughout the assessment of their outcomes. The role of the educator is to facilitate learning and not to impose or direct the lecture. Our major concern should lie on how to ensure our students meet their needs as learners and to adapt to the changing conditions and dynamics.

One of the four pillars of Hyflex courses is the “learners’ choice”. The idea is to give students a choice in how they complete course activities in any given week or subject. The fundamental goal of this approach is to provide flexibility to empower learners so they pursue and attain their learning outcomes in the best way.

Together with active pedagogy, Hyflex approach can only be successful if students, both online and in-person, are strongly involved in the dynamics and functioning of the course. The active role of learners should be part of the expectations of the course and need to be stated and well-established from the beginning. Consider assigning rotating roles to your students to assist you with the technology, the online discussion board, note-taking.

There are plenty of roles you can assign to your students to ensure the course and learning activities run smoothly.

You can also consider pairing or grouping students, so there is always at least one student from a group in class responsible to transfer knowledge and support to others in their group.

Active learning is not something reserved only for in-person classes. It is also suitable for remote and Hyflex approaches if you prepare well in advance the activities and ask your students to appropriate their learning process.

Having your students actively involved both in the activities and the functioning of the course will encourage them to engage with the course material and to understand the challenges of this kind of learning mode.

Asynchronous and Synchronous Student Engagement

Student engagement is by far the most critical aspect of any learning process. Without student’s engagement learning is ineffective, or not possible at all.

One of the biggest fears of shifting to hybrid, remote, or Hyflex teaching is not being able to connect with our students and to make our classes memorable.

In both remote and HyFlex classes it is crucial to establish a set of rules and expectations from the very beginning of your class. It’s important that the teacher and both in-person and online learners are on the same boat sharing a common goal: make the most of their learning together.

If this is not well-established from the first moment things can get really messy. In HyFlex classrooms, in particular, it is easy for remote students to disconnect and feel neglected by those taking part in the physical classroom. It is an enormous challenge for the educator to maintain effective communication and collaboration with both audiences. This is why it’s essential to plan for synchronous and asynchronous activities to ensure that all participation modes which lead to equivalent learning outcomes.

The key relies on how to mix distinct types of active learning activities that promote the interaction of both physical and remote learners. The aim of Hyflex is to provide equivalency and reusability of activities and resources that challenge the learner, regardless of their learning mode, to reflect upon the content and to contribute to the discussion.

Activities in both learning modes can be easily adaptable to other learning approaches and have great potential to strengthen the learner’s experience. Podcasts, video recordings, collaborative note-taking, and handouts, can be very effective both for remote and in-person students wishing to review after class. It also encourages peer-learning. The activities completed by remote learners, such as chats, forums, back-channel can of great support for in-person students and inversely.

The learning experience in Hyflex environments can be as good or even better than in the traditional physical classroom. Engaging students online is not much more difficult than engaging with them in a physical classroom. Online methods provide a wide range of alternatives to promote active learning and teamwork.

Skill and Knowledge Assessment

Another major challenge for any teaching approach is the assessment of student learning.

In a HyFlex environment, the challenge is twofold. First, we need to ensure we use techniques and tools appropriate for effective assessment both online and offline. Second, we need to coordinate the assessment activities that assure the equivalency, accessibility, and usability to all students, despite the place, the time, and the format in which learning takes place.

Traditional assessment methods are far from being a fair indicator of intelligence, knowledge, skills, or effort. And they don’t reflect the abilities and preparedness for work life.

As instructors, we need to reflect on how we can effectively evaluate student’s learning outcomes. We need to ask ourselves how the same learning outcome can be assessed both online and offline? We need to think of new approaches that are more flexible and appropriate to the environment in which learning takes place. Practices that promote reflection, learning, and skills development.

Assessing learning through group project reports, hybrid paired work, video presentations (delivered live or recorded and shared online), Backchannel discussions, Socratic seminars, blog posts and other forms of original assessment are often appropriate in all modes of instruction with very little changes needed.

We need to redefine students’ learning assessments.

Technology and Classroom setting

The main goal of Hyflex teaching is to provide students equal chances to learn and effectively participate in class activities regardless of their delivery mode (online or offline). The Hyflex approach is only effective and successful if the appropriate technology is put in place to back it up. Students, both online and offline, need to be equipped with proper hardware, software, networks, and the skills for using it. Remote learning will not be a possible alternative for a student who does not have reliable access to the internet. Accessibility is crucial. Thus, appropriate support from educators and institutions is essential for providing the appropriate environment to Hyflex teaching.

Classrooms need to be set up and equipped with image and sound capture technologies to support online learners. And both students and educators need to be proficient in the use of synchronous and asynchronous digital tools to collaborate. This technology includes videoconferencing systems, Integrated Learning Platforms, document collaboration, digital whiteboards, digital quizzes, and polls apps, collaborative annotation software, and backchannel discussion rooms.

The key to success relies on proper planning, in advance preparation, and access to the right tools.

Final thoughts

Hyper Flexible model goal is to provide an effective learning opportunity for all students, no matter where they are, and no matter the learning mode they choose.

But flexibility is only possible when all learners have proper access to it. This means that is not only about the content and information itself that has to be accessible to convenient technology and technical skills, so they have a legitimate choice to make.

Hyflex requires interactive and engaging class experience with innovative application of class content to provide optimal learning interactions. Content and activities that are easy to shift directly to fully online or fully offline and a mix in between. The main aim is to provide the most equitable delivery format to students that aligns with their needs and learning preferences.

However, shifting to Hyflex programs requires in advance and constant preparation and organization of pre-class content and coordination of both synchronous and asynchronous activities. The main challenge is to align both types of learners and instructors toward the same goal: effective collaborative learning.


Resources

Abdelmalak, M. M. M., & Parra, J. L. (2016). Expanding learning opportunities for graduate students with HyFlex course design. International Journal of Online Pedagogy and Course Design, 6(4), 19–37.

Beatty B. (2012). Hyflex course design: The advantages of letting students choose the blend. Online Learning Collective.

Beaty, Brian J. Ed. (2019) Hybrid-Flexible Course Design Implementing student-directed hybrid classes, EdTech Books.

Bruff, Derek. (2020). Active Learning in Hybrid and Socially Distanced ClassroomsVanderbilt Center for Teaching.

CNDLS. (2020). Guidebook: HyFlex TeachingInstructional Continuity at Georgetown.

Hyflex (HELIX) Implementation at Harvard Division of Continuing Education: https://teach.extension.harvard.edu/helix

HyFlex Course Design Model with Brian Beatty (2020), Think UDL Podcast.

HyFlex Course Development Guide (2018). Cambrian College Teaching & Learning Innovation Hub.

Hyflex Learning with David Rhoads” (2020). Teaching in Higher Ed Podcast.

Leijon, M., & Lundgren, B. (2019). Connecting physical and virtual spaces in a HyFlex pedagogic model with a focus on teacher interaction. Journal of Learning Spaces; 1, 8.

Miller, J.B., Risser, M.D. & Griffiths, R.P. (2013). Student Choice, Instructor Flexibility:

Moving Beyond the Blended Instructional ModelIssues and Trends in Learning Technologies, 1(1).

Sowell, K., Saichaie, K., Bergman, J., & Applegate, E. (2019). High Enrollment and HyFlex: The Case for an Alternative Course ModelJournal on Excellence in College Teaching30(2), 5–28.

Talbert, R. (2020). Research report: Experiencing the hyflex modelRobert Talbert, PhD.

What To Expect in a HyFlex Course: A Faculty Handbook. (2017) Texas A&M University.